

Peter Miller, Theatre Design Department Faculty at Rutgers University’s Mason Gross School of the Arts, had an inspired revelation at USITT in 2011. He noticed that many of the set designs that required foliage scenery included uninspired, one-dimensional tree-scape drops. So, Peter determined to create a three-dimensional scenic treatment that would envelop the audience into the forest or jungle of the stage set, and show the piece at the next USITT Conference in 2012.
Over the summer of 2011, Peter asked some of his students to help him create the piece and both Rose Brand and Rosco agreed to donate the needed materials for this remarkable foliage scenery display. One of the students who participated in this project was Colleen Dolan, and below is her account of the project that began with the model Peter showed off in his class that eventually became a full-size display at the USITT 2012 conference in Long Beach, California. Her story is entertaining and the tips she provides are invaluable for anyone charged with creating realistic, three-dimensional scenic pieces.
 Peter Miller’s original model of the “Tree Project."
"Would any of you like to help?"
That's how it started. After that, every Sunday, all summer long, we made the trees.
To begin, the TDs of the project, Marc Vogt and Thomas Minucci, built the wooden base armature of the trees, reinforcing it in the back with a steel rod. They're pretty rad! – both the armatures AND Marc & Thomas.
 Marc Vogt and Thomas Minucci modeling with their armatures.
From there we built the armatures up with foam; hacking, carving, and riffling away to find the "shape" of the trees within. Like Michelangelo, but not really at all. Up until this point, I had never manipulated foam in this way. Our shop usually CNC routed it, but since we were going for organic shapes, we used hand tools. Looking at anything up close while working on it is always misleading. I remember thinking the whole time "Oh, I'm so awful at this. There is no way this is going to look like a tree.” And “Look at Peter go, he could win the Sawzall™ Olympics!"
 Naked trees!
We named them "Dinosaur Tree" and "Sleepy Hollow Tree" based on their shapes and features, and the effect they were designed to achieve. The one on the left was designed to look like a tree from the jungle in King Kong, and was shaped kind of like a Brontosaurus. The one on the right was more twisty, and the bark looked like something out of Tim Burton's Sleepy Hollow. We kept these names in mind as we covered the trees.
For the “Sleepy Hollow Tree,” Nathalie Schlosser and Aram Kim cut up little fish shaped pieces of velour cloth that they dipped into a mixture of FlexCoat, paint, a little bit of joint compound and a lot of FlexBond glue. They then bunched the fabric up, to look like the ridges of bark as they laid and smushed them together in organic lines, flowing vertically along the tree.
 Aram Kim adding the velour "fishes" and FlexCoat.
It was a messy process. If you’re trying this at home - wear gloves! And if you have long hair, definitely tie it back. Because everyone knows that awkward moment when your hair falls in front of your face and you push it back without thinking and then you have a FlexCoat handprint embedded in your hair for the rest of the day.
 Nathalie Schlosser, happily finishing up the "Sleepy Hollow Tree".
Jenny Knott, Rosco’s paint and coatings product manager, worked with me on the “Dinosaur Tree,” using a similar process. However, we were using Chincha - a Rose Brand fabric, much like cheese cloth, but easier to manipulate - and more fun to say. We cut "fish shaped" strips of the Chincha on the bias (to retain stretchability) dipped them into the same FlexCoat/paint/FlexBond concoction and laid it horizontally across the tree's surface. Because no tree is smooth, we then bunched up the Chincha to add some texture… Peter is BIG on texture.
 Jenny Knott and I, applying Chincha to the “Dinosaur Tree”.
The dry time for our FlexCoat concoction was rather long, which worked out fine for us since we were only there on Sundays. But for people looking to use this technique on their own productions, I advise you make it a Friday afternoon activity - that way it can dry over the weekend and you won't have to hear every carpenter’s favorite question "So when is this going to be dry?"
My favorite part was making the roots that come off of the trees, flowing onto the rocks, and the branches for the border. First, we made pieces to look like the branches and roots out of thin wire, wrapped them with the Chincha, and laid them all out on a sheet of plastic. Then, using our messy FlexCoat concoction again, we squeezed it through pastry bags along the wire, and branched it off in organic ways.
 Working on the roots.
Then we got the big fans, let it dry for a bit, and continued going over our young roots with the same process several times, making sure that all of the wire and fabric was hidden and re-enforcing smaller "veins" so that they wouldn't snap. Then we left them to dry for a week, moving on to other things. The next week, we peeled the roots and branches off the plastic. THEY WERE SO COOL! They were bendy, like real branches, and durable. But since they were on plastic, one side was flat, so we needed to flip them and repeat the process on the other side, since they're dimensional things.
 Finished roots.
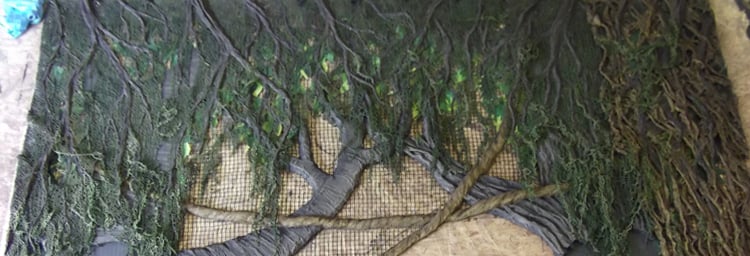
The techniques used on the border were the same as the ones we used on the trees, and being as we knew how to do them, and knew what issues we would encounter, it went much faster. We applied our FlexCoated fabrics to the tops of the trees, glued down the branches, and began working in the other fabrics, like Erosion Cloth, that we'd gotten from Rose Brand. Erosion cloth is not flame retardant; in fact it's the opposite. So, if you ever need to start a fire, you should use erosion cloth. That said, we flame treated the erosion cloth using the tinted FlexCoat, which also acts as a flame retardant.
 Voilà, a Border!
We wrapped up the finished foliage scenery set piece and stored it until it was time to ship it off to the show floor of USITT 2012 in Long Beach, CA.
 Peter Miller’s “Tree Project” on display at USITT 2012.
The "Tree Project" was one of the best experiences in my life. I never thought, when Peter first asked if we wanted to help, that it would go as far as it did or that it would bring Nathalie and I all the way to California. We were "The Rosco Tree Girls" and it was the most fun I've ever had.

Nathalie Schlosser and Colleen Dolan graduated this past Saturday with their BFA’s in Set Design from the Mason Gross School of the Arts.
Jenny Knott May 15, 2012 Questions?

Scenic Paint & Coating Product Manager: A graduate from the University of Missouri, Kansas City with an MFA in Design and Technology, Jenny has been a freelance scenic artist for over 30 years – working for regional theatres including Missouri Rep (now KC Rep), Arena Stage, the Guthrie and Goodspeed Opera House as well as union scene shops. Jenny is a member of United Scenic Artists 829 as well as a past member of USITT’s Board of Directors. Jenny continues to paint, which keeps her current with emerging scenic artists and helps her discover new ways of approaching paint challenges. “Bring on the goop and let’s get creative.”