Jamie Clausius is a Wisconsin-based freelance scenic artist bursting with creative ideas. She recently had some time on her hands and decided to dive into a testing project that would answer her burning questions about fluorescent paint! Her goal was to narrow her mixing and application options to 3-4 processes. In a recent article published in The Guild of Scenic Artists’ Scenic Route Blog, Jamie shared her findings using Rosco Fluorescent Paints. Excerpts from that article outlining her process and results are below.
There are so many different situations fluorescent paint can be used for that I wanted to narrow down my options to 3-4 processes. The question I kept in the forefront of my mind was, ‘What If…?’. What if I want an opaque effect? What if I want it to be a ‘surprise’ in the piece? The goal here was to try to seek out useful answers to questions that I personally had that would hopefully translate as shortcuts for others. To remind everyone, be curious and playful without judgment in oneself, but judgment in the process.
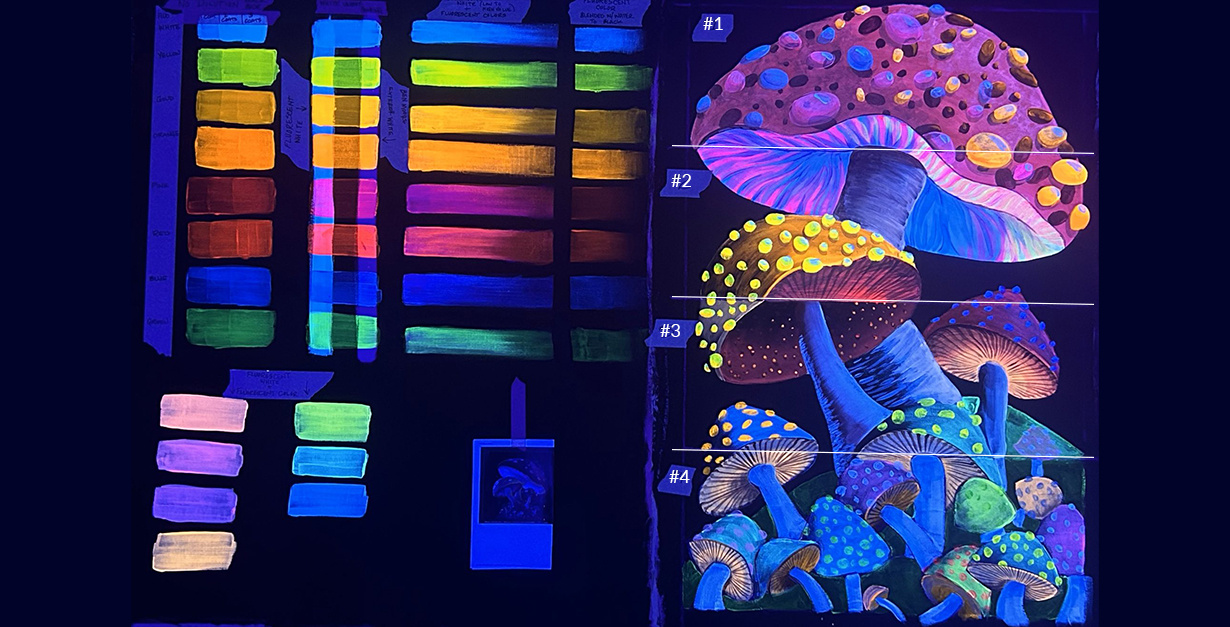
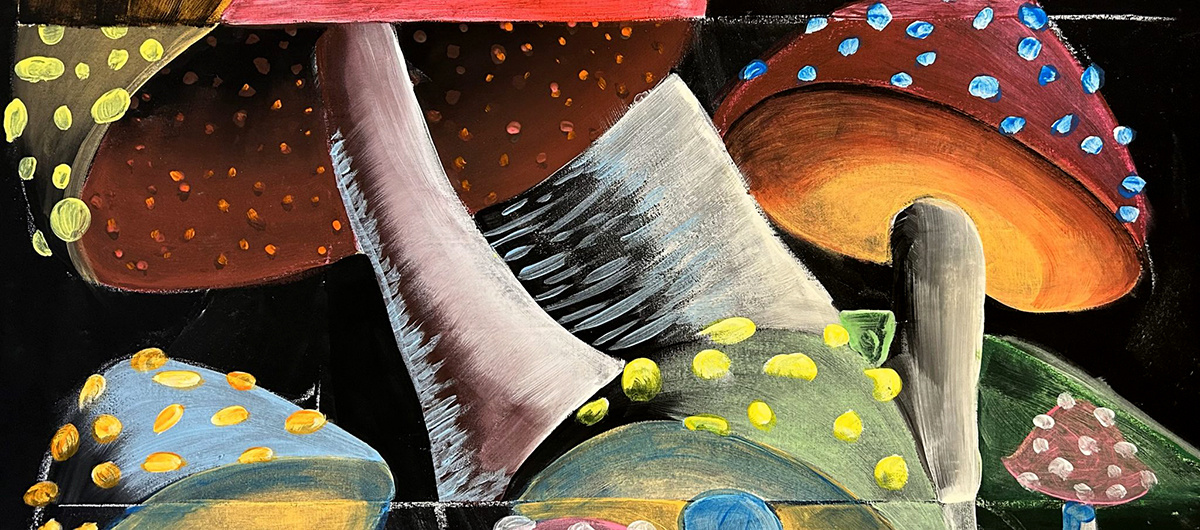
Even though I am not working on this project for a company, a theatre, or a designer, I knew I wanted to narrow down my process to a few choices. Rarely are we given enough time in our jobs to do infinite testing. To keep this project grounded in a real-time application I tried to limit myself. I knew I would be using the paint on a black base color. This would all be completely different on a surface that is lighter, neutral, or white. I wanted to show what the paint could do in 4 ways:
Create a more realistic color spectrum for the piece, with the fluorescent paint coming out as a surprise when lit under UV or black light.
Lay down a base of white first, regardless of light or shadow, and use fluorescent paint on top.
Use fluorescents blended into black to show contrast and a graduated blend between the fluorescents and the black to fade into the background of the piece.
Only fluorescent paint for the inherent, base color of the object.
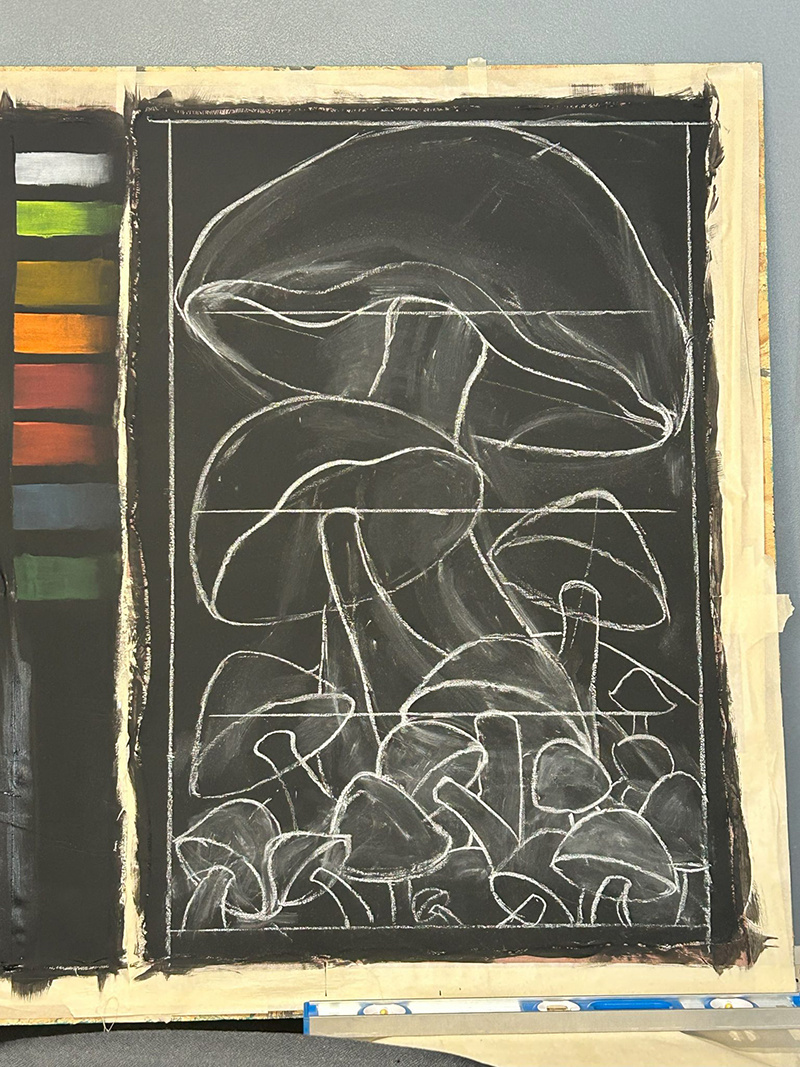 |
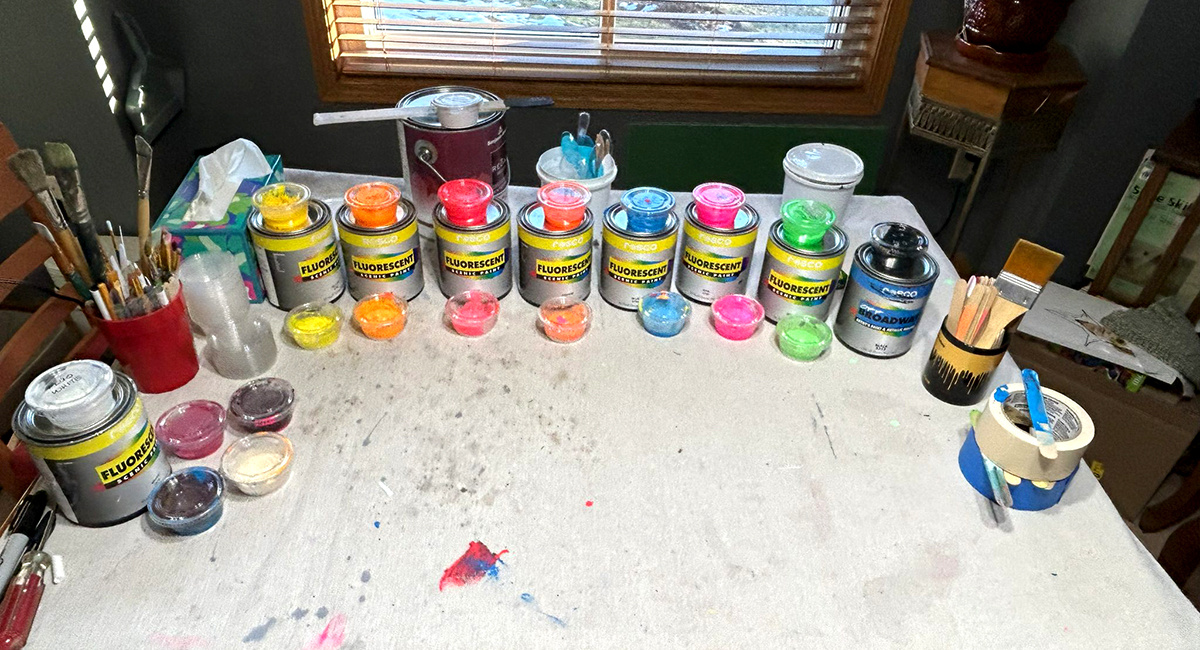
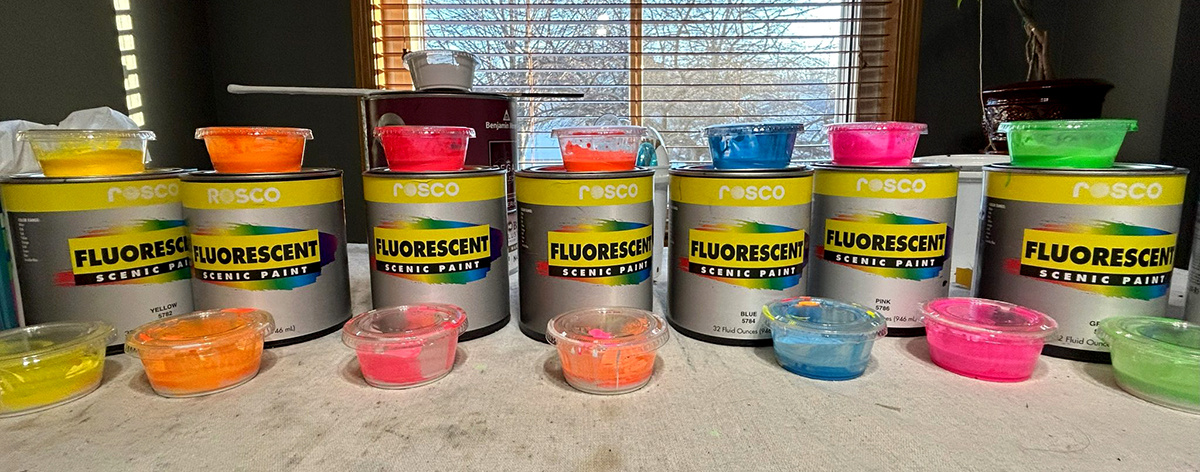
I used a 2’ x 4’ heavy-weight piece of muslin stapled to a sheet of rosin paper-covered plywood. Before priming and basing, I boiled up 2 cups of water and mixed in 4 tablespoons of cornstarch and cold water to seal it. Then I brushed on the sizing liquid and let it dry. After drying, I painted on two layers of Rosco Off Broadway Black paint. I used one half of my fabric for testing, while the other half I reserved for the project. Below are my fluorescent paint findings: |
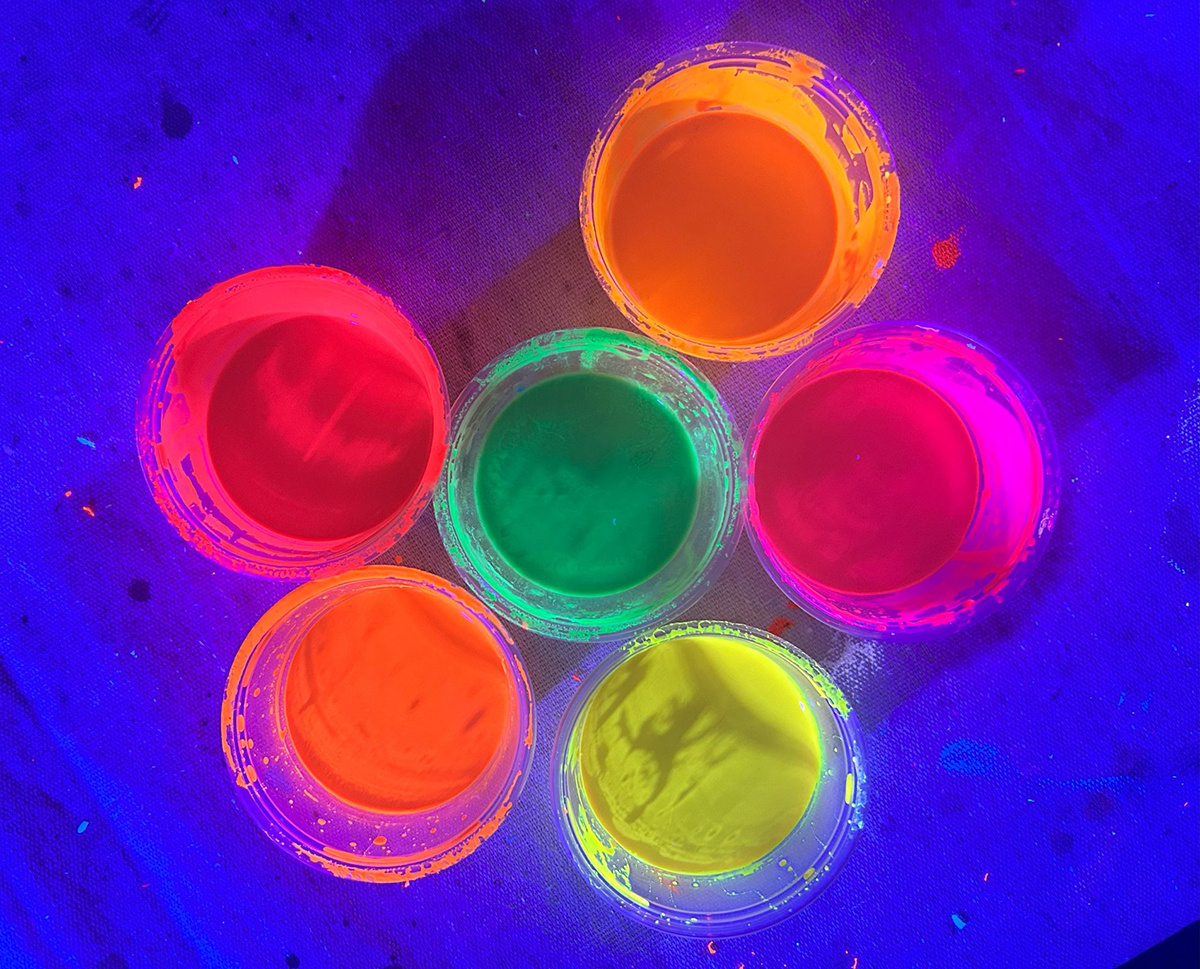
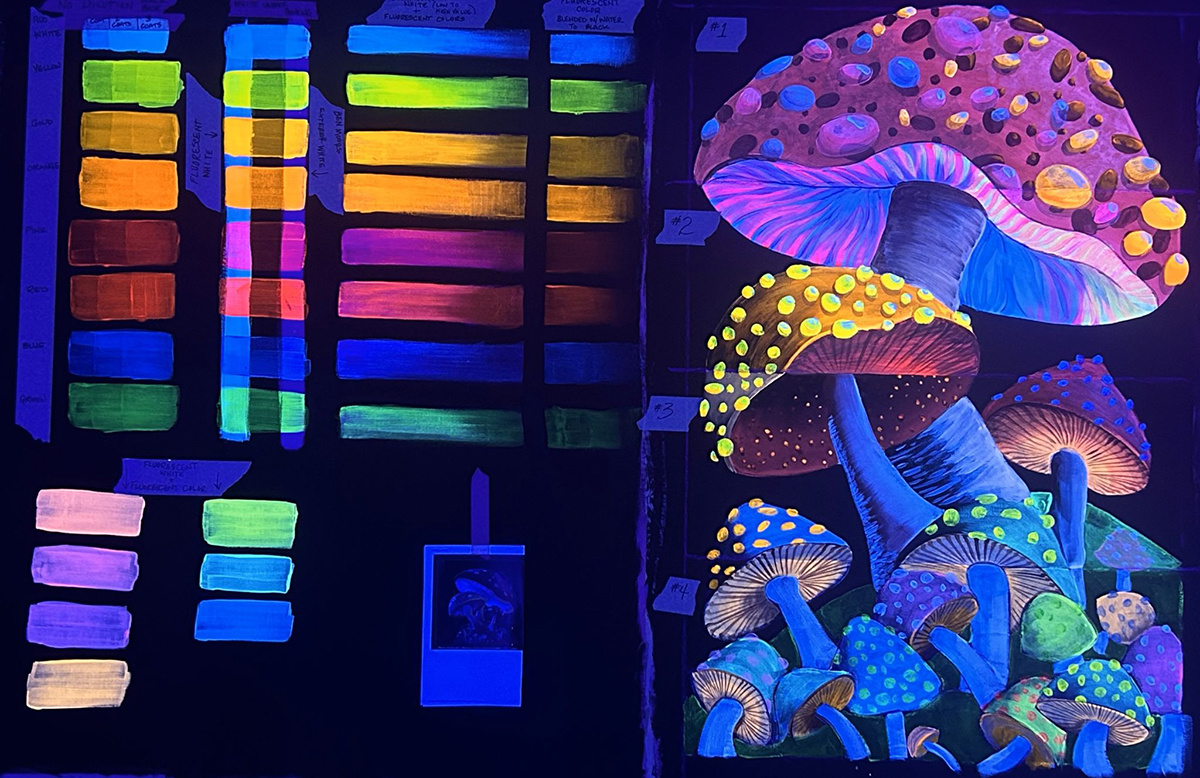
I kept my mixing of the fluorescent colors to a limited number of colors. For a lighter value of each color, I mixed the color with fluorescent white until the value was about halfway between the original color and white. This mixing step doubles my options for either undertones or highlights.
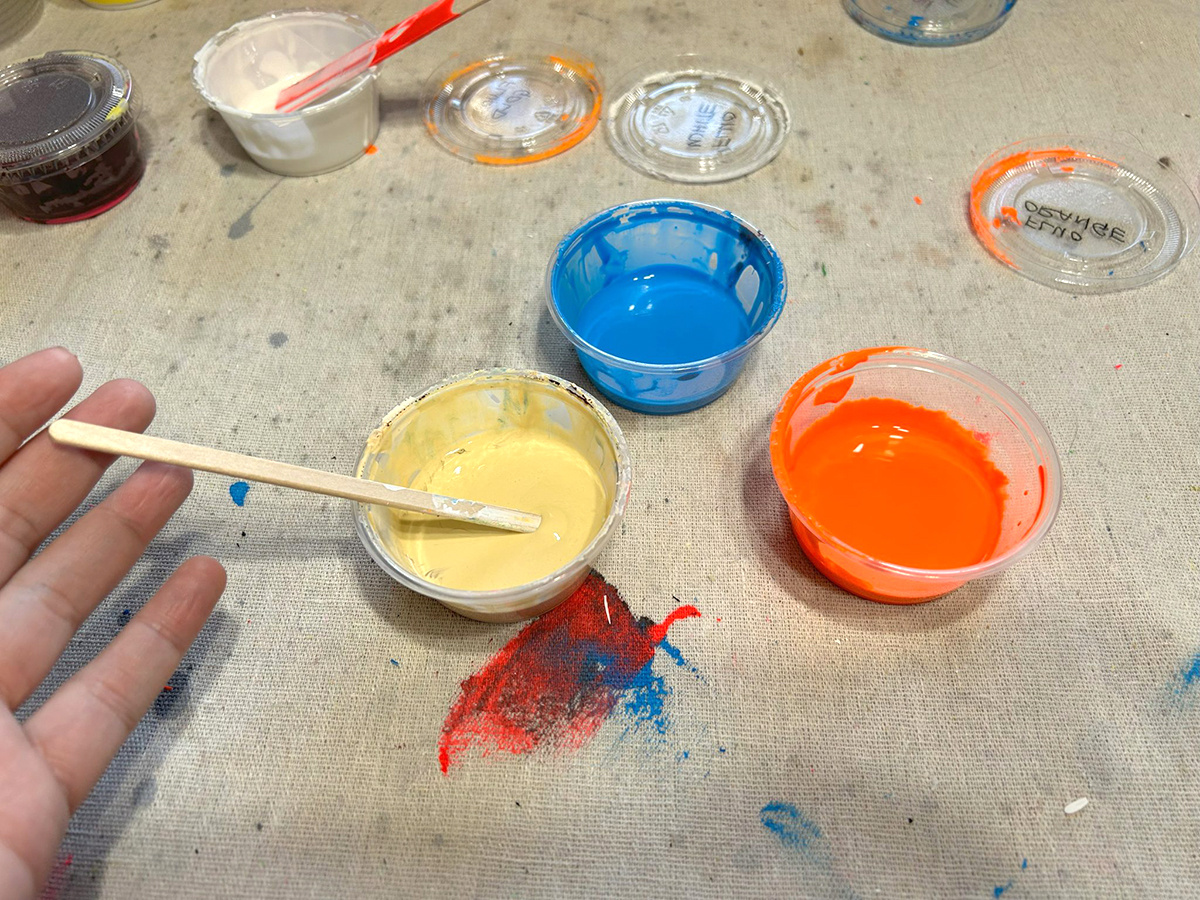
I used my color theory knowledge to create some traditionally "non-fluorescent" colors, while still maintaining their UV properties. For example, I wanted to mix an off-white tan color for the mushroom stems. Knowing that using any non-fluorescent colors in the mix would negate the UV qualities of the paint, I thought back to using complementary colors. I started with fluorescent white and I mixed a drop of fluorescent orange and a drop of fluorescent blue into the white. Blue and orange are classic complementary colors. When I mixed together these fluorescent versions, they created a neutral, gray, or brownish tone that did not turn the resulting color too dark.
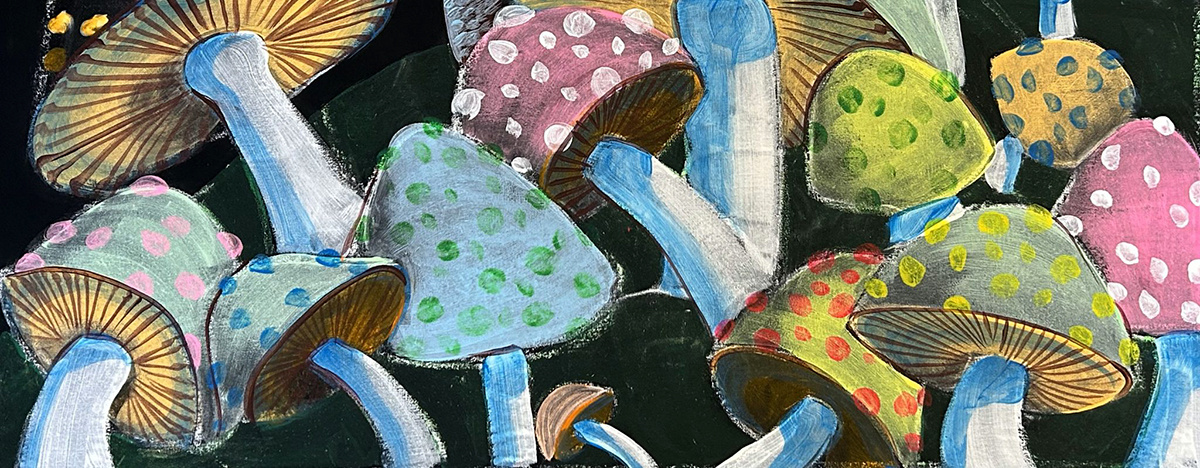
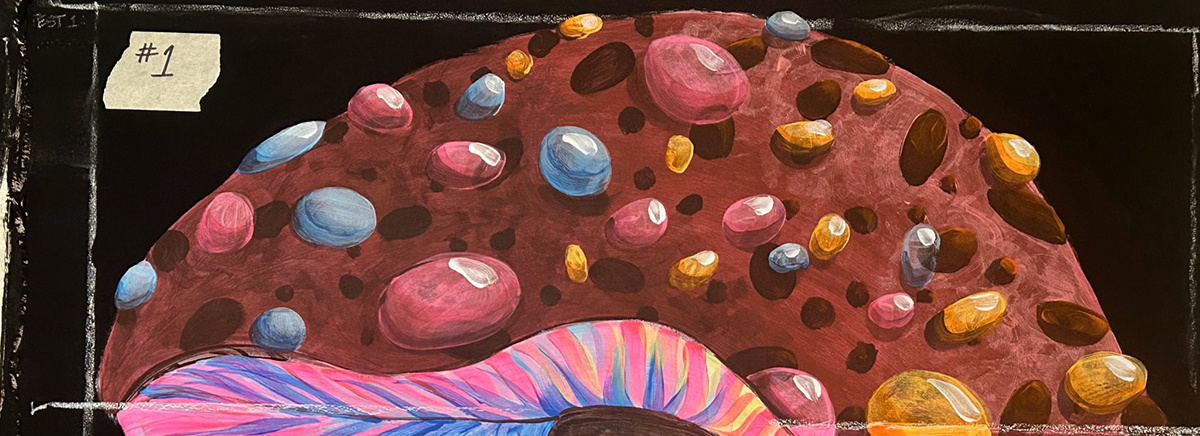 Top section lit with white light.
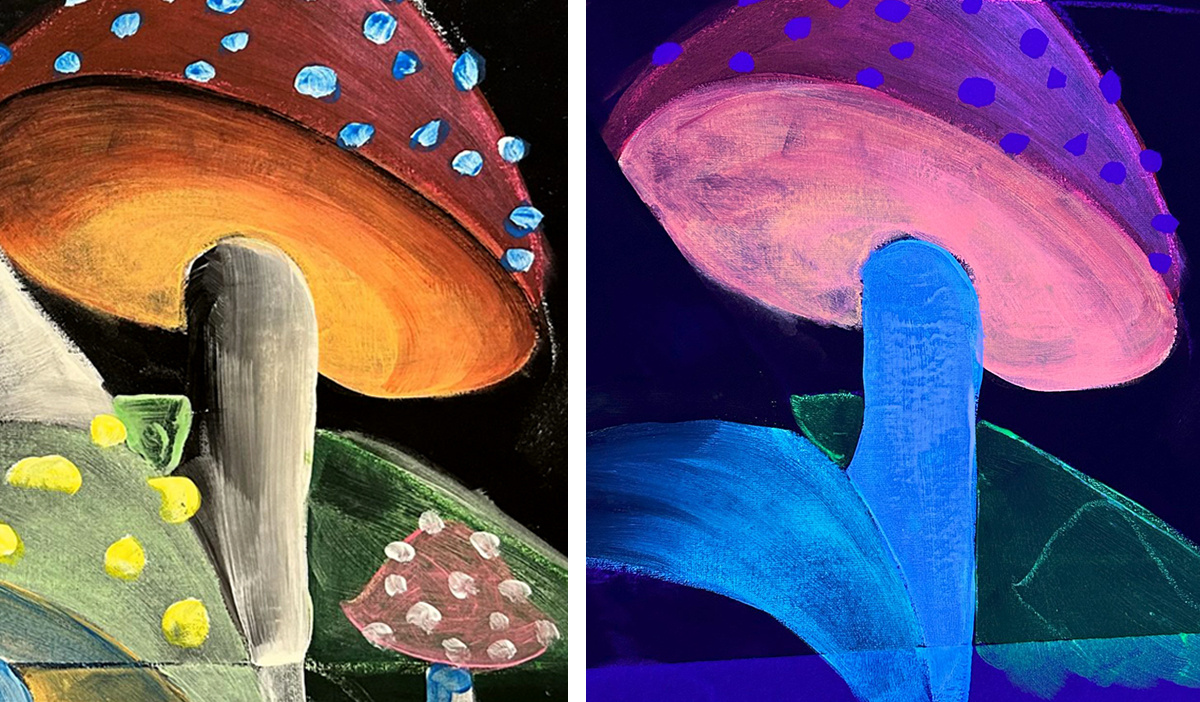
Treatment: White + Fluorescent base, with Fluorescent laid over top.
In the testing phase, I found the fluorescent paint to be quite translucent. This isn’t a bad thing! However, for this treatment I wanted the section to have a more realistic look, with the fluorescent not being particularly obvious. I decided to try and refine a process where I would use the least amount of layering possible to achieve this effect. I mixed a non-fluorescent, Benjamin Moore exterior white latex paint with the appropriate fluorescent color. This created a pastel color for the base but is still vibrant and close in value to the fluorescent color I would eventually use.
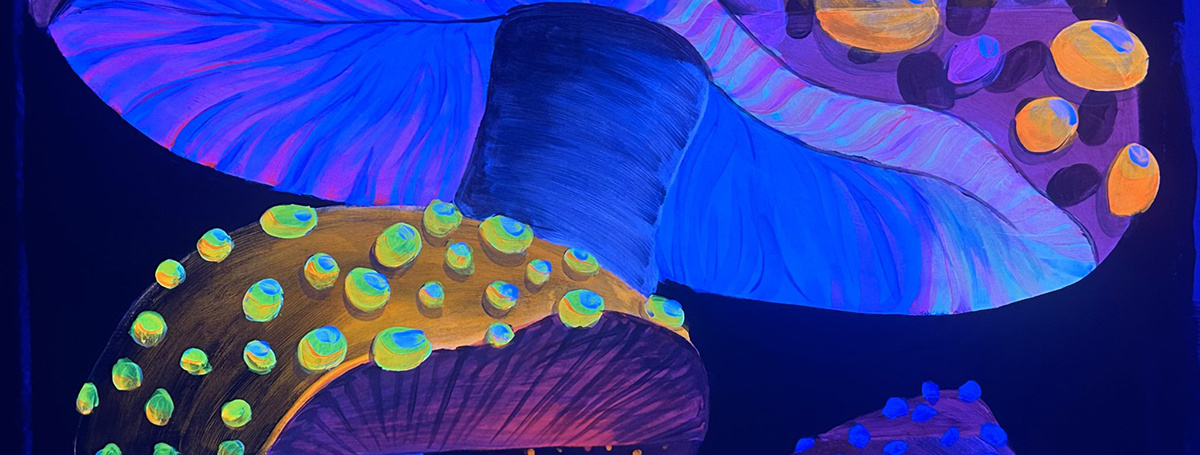
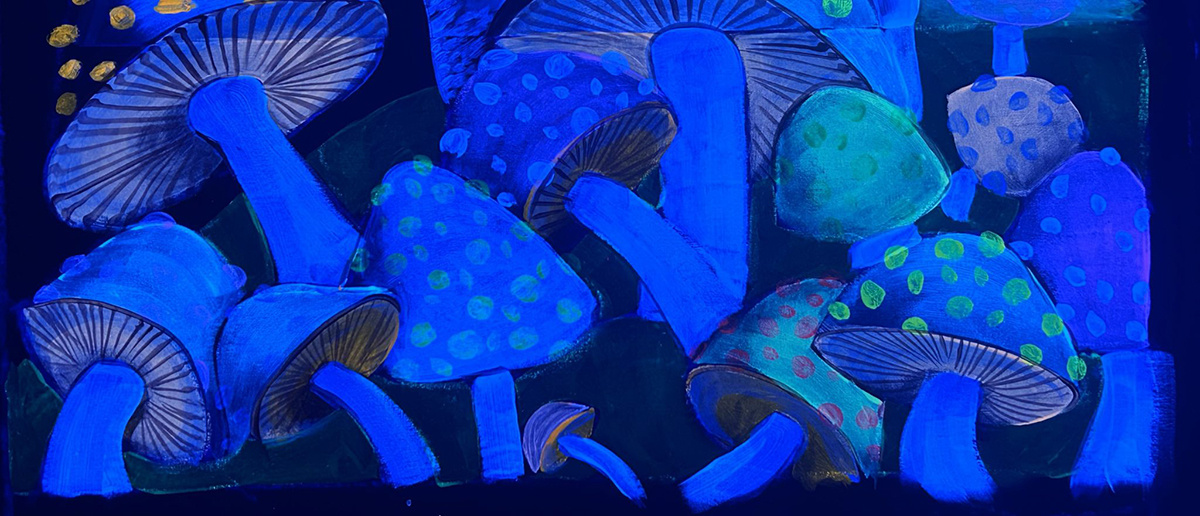
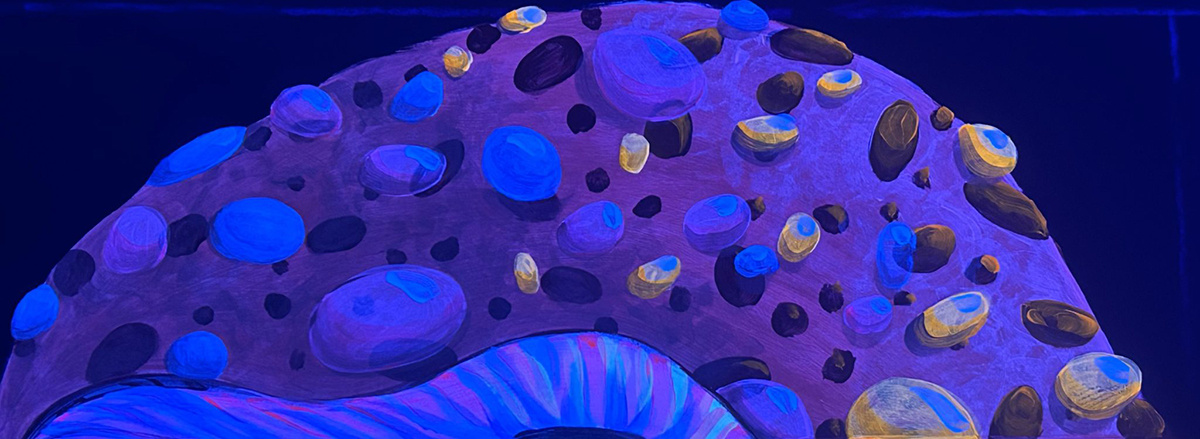 Top section lit with UV black light.
To help give some contrast to the texture of the large mushroom cap, I mixed black with fluorescent to create the dark spots. I also painted in some bright, intense globby spots that are meant to make the eye feel as if the spots were popping forward. I found the fluorescent paint to still be partially translucent with several layers painted in the bright spots. That’s ok! I learned a lesson, if I want them to be opaque, more base may be needed. I still wanted to create shade and depth to the section. I used black (which is not a classic shade/shadow color) mixed with a fluorescent blue. This created a shade color over the top of the mushroom cap. The area looked realistic with its classic light and shadow palette. When lit under black light, it gave some wonderful brightness in certain areas, which helped the eye make sense under non-traditional lighting.
Pro: Even when added to non-fluorescent colors, the fluorescent paint can help keep those colors vibrant. This can also give more variety to the glowing effects; some colors will glow more brightly than others when mixed with non-fluorescent paints, which is wonderful to have as an option.
Cons: Multiple layers may have to be laid down to get an opaque effect. Consider the size of the project and time. The great thing about these fluorescent paints, whatever the under painting is, if a thin application of the fluorescent paint is laid on top it will glow very noticeably under UV/black light.
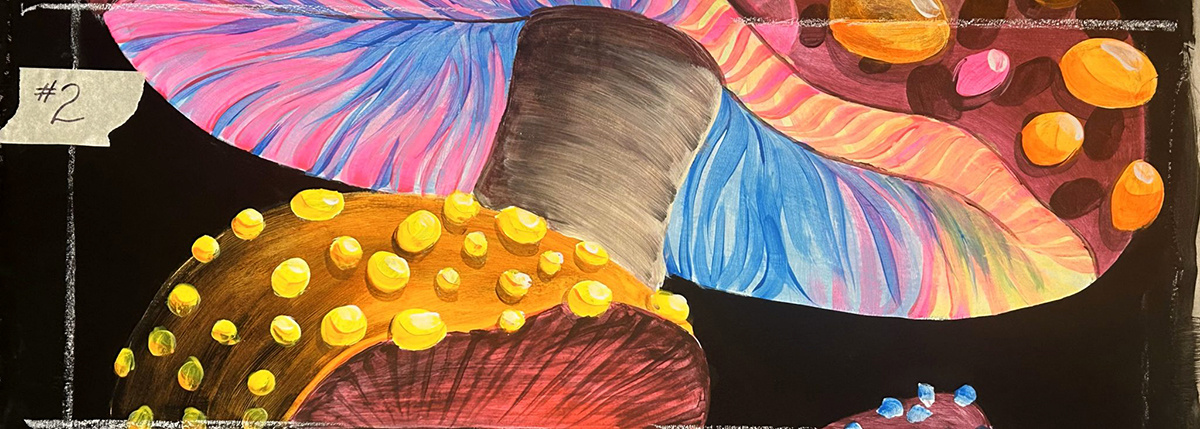 Section #2 lit with white light.
Treatment: Benjamin Moore exterior white as a base, fluorescent paint as inherent local color.
This process created a vibrant, intense fluorescent color. I found it useful to sometimes paint only in the black light. This helped especially when I wanted to paint white fluorescent paint over the non-fluorescent white base. The fluorescent white paint looked invisible over the white base, the only way it could be seen was under the black light. This technique could (should?) be used anytime while painting with fluorescent paint as the fluorescent effect wants to be monitored as it is applied. Under regular white light, the fluorescent-painted areas appeared bright and neon. This treatment gave a wonderful, stylized color palette to the piece.
 Section #2 lit with UV black light.
Pros: This section looks like a more traditional neon style under white light. This would be a fun technique for anything that wants to be bold and bright under all lighting conditions.
Cons: I had a challenge painting with the fluorescent paint in this section. The color would glide on nicely, however, if it had any time to dry at all it was hard to create a consistent color application across the whole area. If any area was painted over before it was completely dry, the first layer would lift up and create a patchy dark area.
There are some techniques to try to help with this issue. Water could be laid down first, creating a damp surface in which the color could stay wet and hopefully blend more evenly. Using a sprayer could also help more evenly distribute the color. Trying out different brushes could also yield different results.
 Section #3 lit with white light.
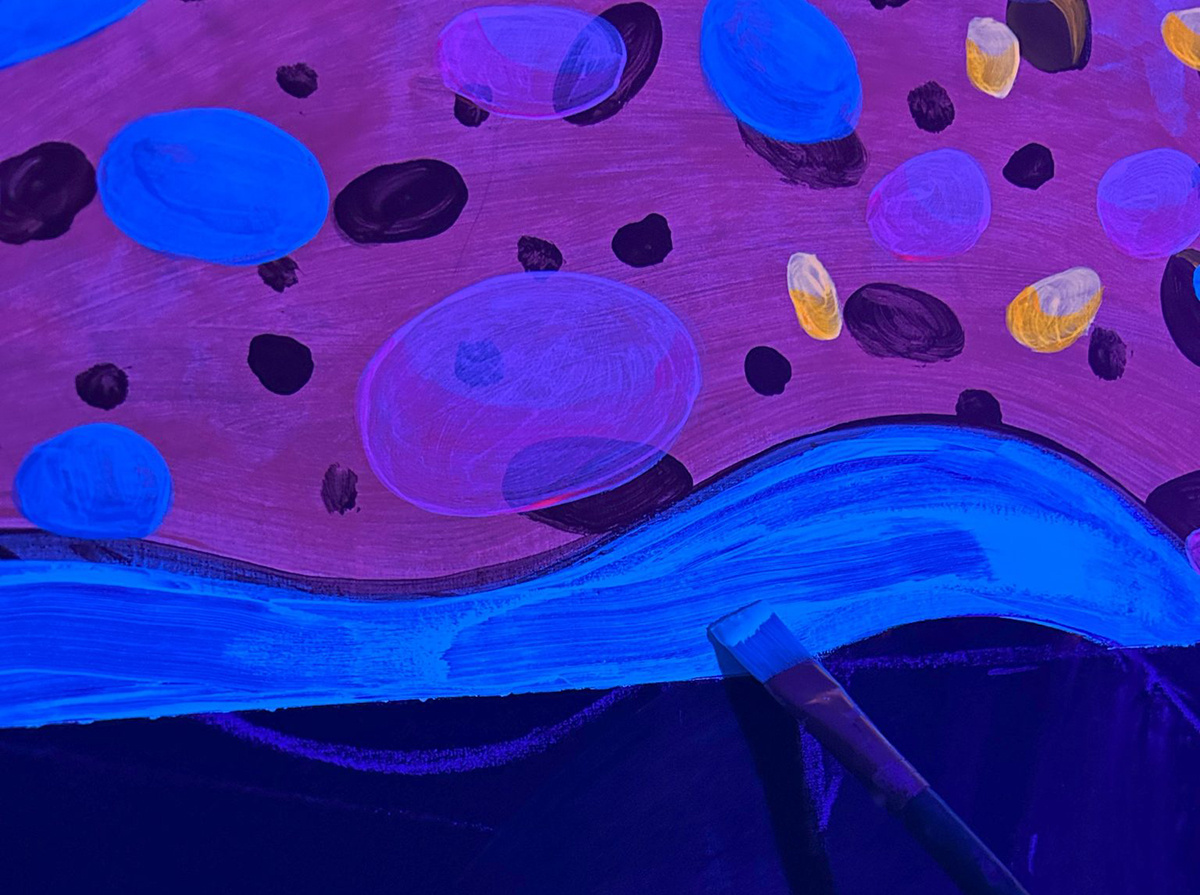
Treatment: fluorescent paint for light areas, blended into black for shade/shadow areas.
In this area, I used black in the shade and shadow areas. Then I wet blended the black with the fluorescent color to give a gradient from dark to light. I used this same technique with the texturing in this section as well.
 Section #3 close-up - lit with white light (L) and lit with UV light (R).
Pros: There are some nice areas of subtle gradation. Under UV light this fact helped reinforce the shapes of the mushrooms and kept the fluorescent paint from appearing ‘flattened out.'
Cons: Using black means the shape of the mushrooms faded out into the black background. Black is a hard color to use as a shade/shadow value, it ‘deadens’ a color and is not a traditional dark value used by artists.
 Bottom Section with white light.
Treatment: Only fluorescent paint.
This section worked up very quickly for me. I tried to paint it in a very simple manner. I used the fluorescent paint as the local color. I did mix some fluorescent white into each color to help it ‘sit up’ and stand out from the black background. I blended the fluorescent paint with water with the intention of making the color fade to black in the shade and shadow areas. While painting I thought of this section as a value study from light to dark, rather than considering the color.
 Bottom Section with UV light.
Pros: The fluorescents turned into more of a pastel look when lit with regular light. I had no expectations as to what I wanted this section to turn out to be.
Cons: When lit with the black light, the shapes flattened out a bit. I could tell what parts of each mushroom were meant to fade into darkness. I had to apply multiple coats of the fluorescent paint in the areas of high value to interpret those areas as highlight.
Thank you for coming on this journey with me. I hope this article has given you some inspiration to try out this high-quality paint. I hope you find the process fun and useful in other painting applications throughout your scenic careers. Remember to ask questions, test for answers, and adjust the process when needed. Don’t be afraid to make mistakes and judge the piece in front of you (and yourself!) as fairly as possible.
If you want to learn more about Jamie’s techniques and process for this scenic painting experiment – be sure to read the full article in the Guild of Scenic Artists blog. If you’d like to learn more about the vibrant scenic paint she used to conduct her experiments, please visit the Fluorescent Paint product page on the Rosco website.
|
|
Jamie Clausius has been working as a scenic artist since her training at Cobalt Studios and she has worked with institutions such as the University of Iowa, and Oakland University in Michigan as a scenic and teaching artist. Jamie works with USITT as the Lead Organizer and Presenter at the Paint Lab series of events and she is also one of the co-teachers of Summer Scene Painting at Cobalt Studios. Jamie currently resides just outside of Madison, WI with her husband Parker, and two cats Luna and Josie. |
|
Additional Reading: Fluorescent Painting Techniques For Creating Realistic Neon Scenery |
Brittney Pecor July 11, 2024 Questions?

Prior to joining Rosco in 2018, Brittney worked as a lighting technician and light board operator in a variety of theatrical and concert venues. In her prior role as a Project Manager for our Rosco Architectural division, Brittney gained extensive knowledge of our architectural products as she built relationships with our customers. Her background in Live Entertainment and her experience with Rosco’s architectural products make Brittney a valuable resource for technicians and designers around the world.